Body and interior |
The seats, seat belts, doors, etc. are described on the following pages.
| pg. 27 | Front seats |
| pg. 28 | Rear-view/side-view mirrors |
| pg. 29 | Interior light, sun roof |
| pg. 30 | Child safety |
| pg. 32 | Seat belts |
| pg. 34 | Supplemental Restraint System (SRS) |
| pg. 36 | Doors and locks |
| pg. 37 | Child safety locks, Trunk lid (sedans) |
| pg. 38 | Trunk, long load storage |
| pg. 39 | Hood |
| pg. 40 | Passenger compartment, storage spaces |
| pg. 41 | Tailgate, Child safety lock (wagons) |
| pg. 42 | Station wagon tailgate, storage space |
| pg. 43 | Folding rear seat (wagon) |
| pg. 44 | Removing seat cushions, Securing cargo |
| pg. 45 | Cargo space lighting, spare tire, jack (wagon) |
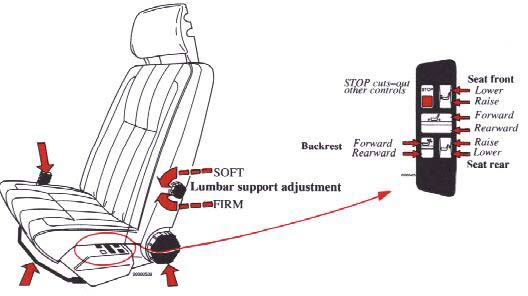
Height adjustment (manual)
The front section of the driver's seat can be adjusted to three height positions and the rear section to four.
Lever forward = front height adjustment
Lever rearward = rear height adjustment
Do not adjust the seat while driving.
The front and rear sections of the passenger's seat can each be adjusted to two positions. Suitable tools must be used to carry out the adjustments.
Fore-aft seat adjustment (manual)
Pull control upward, then slide seat forward or rearward to desired position.
Make sure that the seat is properly secured when you release the control.
WARNING! Do not adjust the seat while driving. The seat should be adjusted so that the brake pedal can be depressed fully. |
Electrically operated driver's seats (certain models)
The front seats are electrically operated.
Using the switches on the sides of the seats you can adjust:
- the height of the seat (rear)
- the height of the seat (front)
- the forward-backward movement
- the backrest tilt
Seat back inclination adjustment
Rotate control clockwise to tilt seat back rearward.
Rotate counterclockwise to tilt seat back forward.
Note that body weight must be shifted to allow seat back to move forward or rearward.
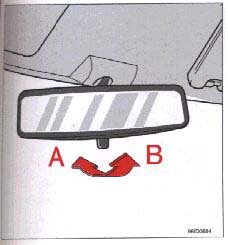
Rear-view mirror
A
Normal position
B
Night position, reduces glare from following headlights
CAUTION: Never use ice scrapers made of metal as they can easily scratch the mirror surface. |
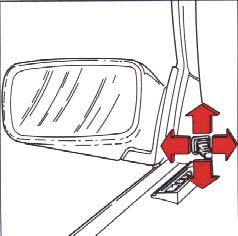
Side-view mirrors
Use the lever to adjust.
WARNING!
|
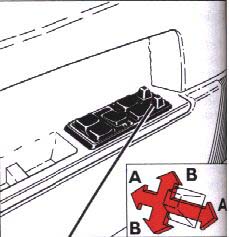
Switch for electrically-operated side-view mirrors
Electrically-operated side-view mirrors (Optional)
The control switches are located in the driver's door armrest.
A
Adjustment sideways
B
Adjustment up/down
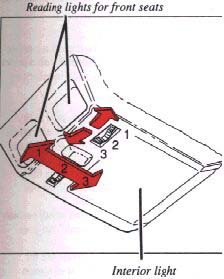
Interior light
1 Light always on.
2 Light always off
3 Light is on when either of the front or rear doors are opened.
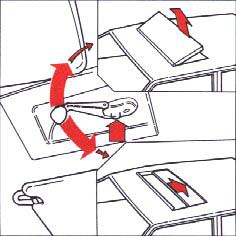
Sun roof (Optional)
The sun roof can be used in two ways: as a conventional sliding roof, or the rear edge can be raised or lowered to provide various ventilation positions.
1 Depress the button prior to cranking.
2 Counter-clockwise: sliding roof
3 Clockwise: ventilation positions.
WARNING! For added safety, always have the crank folded during driving. |
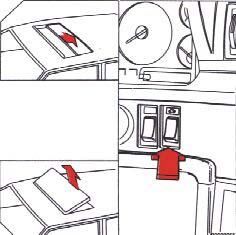
Electrically-operated sun roof (GLE-16 Valve, Turbo)
To open the sun roof as a sliding roof,
depress the top portion of the rocker switch.
To raise the rear edge of the sun roof, depress the bottom portion of the switch.
To close the sun roof, depress the side of the rocker switch opposite the side used to open the sun roof.
NOTE: In case of sun roof malfunction, see "Service diagnosis". |