Fuse replacement
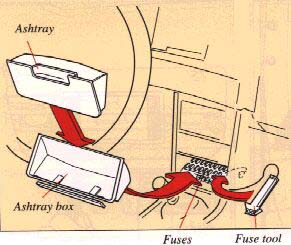
A blown fuse is indicated by the failure of all the units protected by it, and it is caused by overloading the circuits. The fuses (and relays) are located in the central electrical unit behind the ashtray in the center console.
To obtain access to the central electrical unit:
Remove the ashtray. Pull out and depress the tongue.
Press up the section marked "electrical fuses-press" and remove the unit.
There are 25 fuses in two rows. See following pages for fuse designations/locations.
pg. 81 Fuses (cont.) |
It is necessary to remove the fuses to see if they are blown, see next page for information on fuses and related circuits.
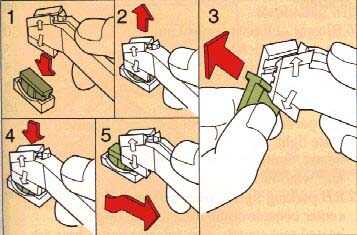
If you find it difficult to obtain access to the fuses, unclip the fuse tool on the right-hand side of the fuse compartment and use it to remove the fuse, see illustration.
1 Press the tool onto the fuse.
2 Pull the tool and fuse straight up
3 Pull out the fuse from the tool and push in a new fuse in the same way.
4 Push in the fuse in the fusebox with the tool.
5 Slide the tool out.
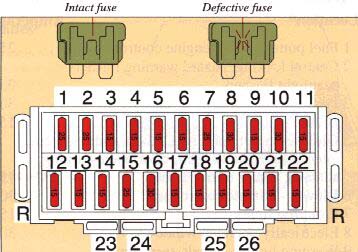
The fuses are removed by pulling them straight out. If they are defective, the metal wire is broken. When fitting a new fuse, be certain to use one with the same amperage and color as the one removed (see top of fuse)! Spare fuses are located on each side of the fusebox (1x15A, 1x25A, 1x30A).
pg. 82 Location* |
Location*
Amperage
1 Fuel pump (main), engine control systems
25
2 Central locking, hazard warning flashers, headlight flashers
25
3 Spare
-
4 Brake lights
15
5 Glove compartment light, clock, radio, engine compartment light, interior light, trunk light,
antenna, door open warning, power antenna, make-up mirror light
15
6 Heater fan ECC
30
7 Power seats
30
8 Electrically operated windows
30
9 Warning light, seat belt, turn signals, air conditioning relays, heated front seats,
electrically-operated windows
15
10 Heated rear window Power-operated sunroof Heated side-view mirrors
30
11 Tank pump, Lambda-sond
15
12 Back-up lights, cruise control, overdrive (manual transmission),
disengagement of 4th gear on automatic transmission
15
13 Spare
14 Electrically-operated side view mirrors, cigarette lighter, radio, rear wiper (wagon)
15
15 Horn, windshield wash/wipe
25
16 Heater blower, air conditioning
30
17 High beam (left)
15
18 High beam (right), extra lights
15
19 Low beam (left)
15
20 Low beam (right)
15
21 LH parking lights (front and rear), license plate light, light for: ash tray,
heater, control panel, switch for heated rear window
15
22 Seat belt light, RH parking lights (front and rear), center console compartment,
lighting for: Heated seat switch, gear selector panel, rear ash tray
15
23 Heated front seats
25
24 SRS test socket
25 Rear fog light
15
26 Radio
15
For more detailed information concerning function and location of relays, fuses, etc., refer to the Volvo Service Manuals. These can be purchased directly using the Service Literature Brochure/Order Form or through your Volvo dealer.
* Some of the equipment/systems listed may be available on certain models only and/or as optional items only.
NOTE: On cars equipped with ABS, the system is protected by an additional 10A fuse located under the instrument panel to the left of the steering wheel. |
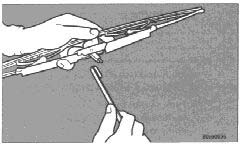
 Replacing wiper blades
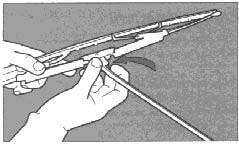
Lift the wiper arm off the windshield and hold blade at right angles to arm. Pinch the end of the plastic clip located at the back of the arm.
Slide the wiper blade along the arm to release it from the hook.
 Install new blade (installation is the reverse of removal) and make sure that it is properly attached to the wiper arm.
For reasons of safety, you should change the windshield wiper blades as soon as they start to leave marks on the windshield or fail to wipe efficiently and cleanly.
 The wiper blades can be cleaned by using a stiff-bristle brush and warm, soapy water.