Turn signals
Turn signals
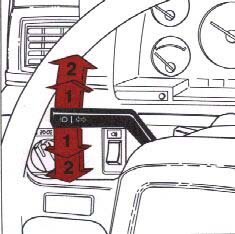
1 Lane change position
: In maneuvers such as lane changing, the driver can flash the turn signals by moving the turn signal lever to the first stop and holding it there. The lever will return to the neutral position when released.
2 Signal lever engaged for normal turns
Note: Defective turn signal bulb will cause turn signal indicator and remaining signal lights to flash more rapidly than normal. |
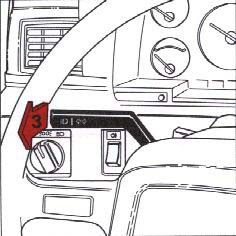
3 High beam/low beam switch (headlights on)
Move the lever towards the steering wheel past the headlight flasher position and release it.
3
Headlight flasher (headlights off)
Move the lever towards the steering wheel.
The headlight high beam will be on until the lever is released.
Hazard warning flasher
NOTE: Regulations regarding the use of the hazard warning flasher may vary from state to state. |
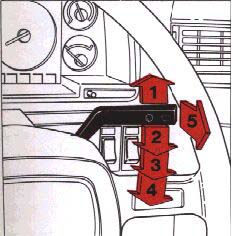
Wiper/washer
1 Intermittent wiper.
With switch in this position, the wipers will sweep approximately every seventh second.
2 "Single sweep" position.
Switch returns automatically when released
3 Wipers, low speed.
4 Wipers, high speed
5 Windshield wiper/washer
The wiper will make 2-3 complete sweeps after lever is released.
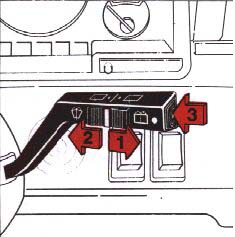
Tailgate window wiper/washer
(wagon)
The tailgate window wiper/washer is operated by a switch at the end of the wiper lever.
1.
The wiper operates continuously.
2.
Intermittent position:
the wiper strokes approximately every 10 seconds.
3.
Tailgate washer.
After the button is released the wiper strokes 2-3 additional times before stopping.
The electrical circuit is protected by fuse 12, located in the central electrical unit. See the section entitled "Fuses".
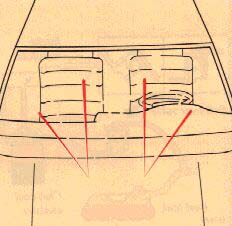
Adjusting washer nozzles
The washer jets should spray the windshield as shown. Use the edge of a small screwdriver to adjust the nozzles, if necessary.
Washer fluid reservoir
The washer fluid reservoir is located in the engine compartments and holds approx. 0.5 US gal. (2 liters) - sedans and 0.8 US gal (3.2 liters) - wagons.
During cold weather, the reservoir should be filled with windshield washer solvent.
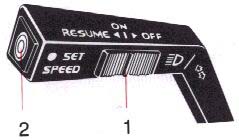
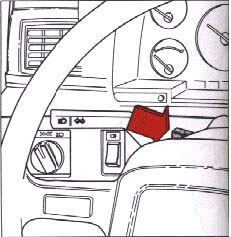
Cruise control
(optional on certain models)
The cruise control switches are located on the turn signal switch lever.
To engage and set desired speed:
· Set switch (1) to ON.
· Accelerate to desired cruise speed.
NOTE: The cruise control cannot be engaged at speeds below 22 mph (35 km). |
· Depress SET SPEED switch (2).
Operating brake pedal or clutch pedal
(where applicable)
This will automatically disengage the cruise control. Previously selected cruise control speed is retained in the memory and by momentarily setting the switch to RESUME position that speed will be re-engaged.
If the cruise control is already engaged, the cruising speed can be increased by depressing the SET SPEED button (2). The vehicle will then maintain the current speed.
NOTE:
|
Acceleration
Momentary acceleration, such as for passing, does not interrupt cruise control operation. The previously selected speed will be maintained without having to set switch to RESUME.
To disengage the cruise control system : set switch (1) to position OFF, or depress the brake pedal. Switching off the starting (ignition) switch or moving the gear selector to position N will automatically disengage the cruise control system.
WARNING!
The cruise control should not be used in heavy traffic or when driving on wet or slippery roads.
|
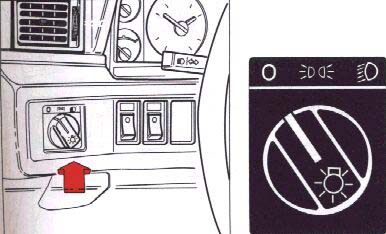
 All lights off *
 Parking lights ON. With the headlight switch in this position, the parking lights will stay ON.
 Headlights and parking lights are ON, if starting (ignition) switch is in position I or II. If the headlight switch is in this position, all lights will go out when the starting (ignition), switch is turned OFF. Change from high to low beam (and vice versa) by moving the turn signal switch lever on the left side off the steering column toward the steering wheel.
.
Headlights and parking lights are ON, if starting (ignition) switch is in position I or II. If the headlight switch is in this position, all lights will go out when the starting (ignition), switch is turned OFF. Change from high to low beam (and vice versa) by moving the turn signal switch lever on the left side off the steering column toward the steering wheel.
.

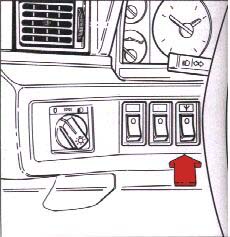
Rear fog light
The rear foglight is considerably brighter than the normal tail lights and should be used only when the atmospheric conditions, such as fog, rain, snow, smoke or dust reduce the daytime or nighttime visibility of other vehicles to less than 500 ft (150 meters). The headlights must be switched on. Note that the local regulations governing the use of these lights may vary.
Auxiliary front fog lights
(optional on certain models)
Auxiliary front fog lights can be switched on only with the low - beam headlights on.
Power antenna
The power antenna switch can be used to retract the antenna when the audio system is turned on. This will permit operation of the cassette drive with the antenna in the down position.
CAUTION: Always lower the antenna when entering a garage or car wash to avoid antenna damage. |
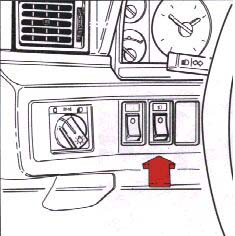
Rear window demister
To operate, depress the switch. The indicator lamp in the switch will come on. The system switches off automatically after 10-15 minutes on certain models.
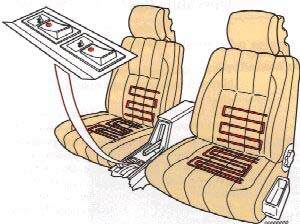
Heated front seats
The front seats are equipped with electrically-heated backrests and seat cushions. The heating is thermostatically-controlled and cuts out automatically.
Use the switches to disengage the seat heating manually when the seat is not occupied.
Extra heating (certain models)
Switched on and off as required. When switched on, the seats are automatically heated and when the optimal temperature is reached, the heating automatically switches off .
The passenger seat will only be heated when it is occupied.
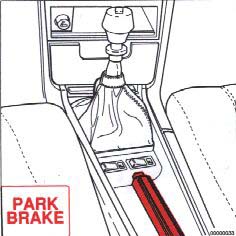
Parking brake (hand brake)
The lever is situated between the front seats. The brake is applied to the rear wheels. In order to obtain the best possible performance of the parking brake, see section titled "Brake System".
WARNING!
|
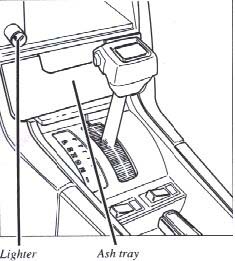
Cigarette lighter
To operate, depress the knob fully. When the knob automatically releases, the cigarette lighter is ready for use.
The starting (ignition) switch must be switched on (to position I or II) for the cigarette lighter to function.
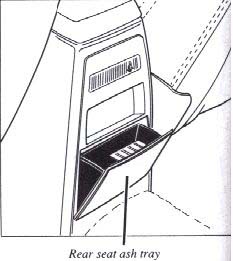
Ash trays
To remove the ash trays depress the center spring and remove.
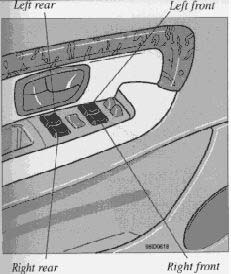
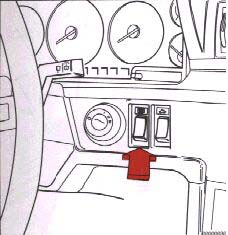
Electrically-operated windows
(GLE, Turbo models)
The electrically operated windows are controlled by switches from the driver's armrest as shown in the above illustration.
The starting (ignition) switches must be ON (position II) for the electrically operated windows to function. The window is lowered if the rear part of the switch is pressed and raised if the front part of the switch is pressed.
WARNING! Remove the starting (ignition) key when children are left unattended in the vehicle. |
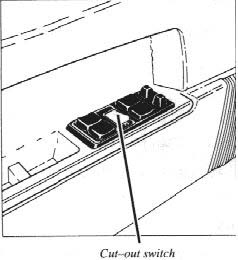
Cut-out switch for electrically-operated rear-door windows
If the car is equipped with rear door windows, this function can be disabled by a switch located on the driver's door armrest. This switch is positioned 90ş in relation to the other switches.
 The rear door windows can be raised or lowered with the respective door switch as well as the switch on the driver's door.
 The rear door windows cannot be raised or lowered with the respective door switch but instead only with the corresponding switch on the driver's door.
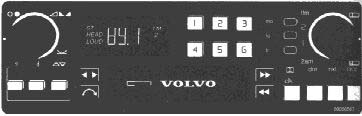
Operating instructions
For complete operating instructions, maintenance guidelines, and specifications, please consult your Audio Cassette/Tuner Instruction Booklet. The Booklet also contains information on radio reception and the radio antenna.
Radio antenna mast
NOTE:
Always lower the antenna mast when entering an automatic car wash.
|
Multipath Distortion
FM Signals are typically "line-of-sight", and very reflective. Their reflectivity to objects such as buildings, mountains, even other passing vehicles, causes the condition known as multipath distortion. This distortion is the result of the reflected signal, and the direct signal reaching your antenna at slightly different times causing a cancellation of all signals. This condition will sound like hissing, or static. Very little can be done to eliminate this problem, however, lowering the treble on your radio could help mask these disturbances thereby allowing you to achieve optimum pleasure from your audio system.